Creating a sub-assembly

Your project most likely has sub-assemblies. For eg, if you are building an electric bike some of your sub-assemblies are front suspension, drive train etc, battery pack etc. You can document and version-control each sub-assembly separately.

The following steps guides you in creating sub-assemblies.

Step 1: 
Go to your Makey page and click on "Overview" tab.

Step 2: 
Click on "Add a subassembly" button.

Step 3:
Creating a sub-assembly is similar to creating a new project.  Notice that on the image above is says that the new module that you are creating is a sub-assembly to your existing project (Super fast rocket) 

Enter required details click “submit”. 

Here we just created a sub-assembly “Propulsion System”. It is now visible on the overview page of your original project.

Step 4: 

Hover on any sub-assembly – it will show you basic stats on that sub-assembly

Click on any sub-assembly – it will show you insights that are added to that sub-assembly

As you can see, we just created a new sub-assembly. The new sub-assembly does not have any insights. To create insights in a sub-assembly you will need to navigate to the separate page of that sub-assembly. Click on “Go to Propulsion system” (Dotted oval) 

To get a better idea on how sub-assemblies work, check out this project - http://www.makeystreet.com/alex/firefly-v1/overview

Editing Makey description

You might want to edit makey description at some point of time. Here is how you do it. 

Step 1: 

On your Makey page, click on "settings". 

Step 2: 

On the settings page, you will find "Description" Field. Edit the field. 

Step 3:

Click on "Update" button to save changes. 


Editing Makey name

You might want to edit your Makey name at some point of time. Here is how you can do it. 

Step 1: 

On your Makey page, click on "settings". 

Step 2:

On the settings page, you will find "Makey Name" Field. Edit the field. 

Step 3: 

Click on "Update" button to save changes. 

Adding a collaborator to your makey

If you are a collaborator to a makey, you have admin rights to add another person as a collaborator to a makey. Others can make one off contributions to your makey without being a collaborator. Being a collaboration give you editorial and admin rights. Here is how you can add a collaborator to your makey. 

Step 0: 

Make sure that the new collaborator is signed up on Makeystreet.

Step 1: 

On your makey page click on "settings" button on the top right


Step 2:  

On this page you can edit your makey's name and description. Towards the bottom of the page you will find the "collaborators" section.


Step 3: 

Type in the name of new collaborator into the "add a collaborator" field. The auto fill will suggest possible people who you are looking to add. Select the person and click on the "add" button .

Ninebot one - tear down to fix a puncture

The Ninebot one that we have, was lying idle for a couple of days due to a puncture in the tire. We are demoing the unicycle at Construkt fest here in Bangalore. So we decided to fix the puncture. 

Overall it took us close to 4hrs to fix the puncture. Apparently it seems we have to tear down the entire unicycle to repair a puncture. This was super painful. This time includes 2 trips to the puncture shop, tear down, putting it back and taking pictures in between. 


The picture above shows all the parts in Ninebot one teardown

Following are roughly our thoughts regarding the design of the Ninebot one - what we liked and what we did not. 

To get access to the wheel, the pedal needs to be removed. We had a lot of trouble removing the pedal. There is a pin that needs to be removed to remove the pedal. The pin was jammed on one side. That took us a lot of time to pull that out. 

There are a bunch of bolts that needs to be removed to remove the casing on one side. Those bolts were obvious except for one side. This one set was close to the pedal and hidden behind a pad that was glued to the plastic casing. The image above shows these sets of bolts that I am referring to. 


These set of bolts also came with a split washers as shown in the image above. They are 4 in number on each side. These split washers makes sense for this bolt as these bolts attach the body of the unicycle to the wheel axle. This is one of those critical joint where any loose connections on this joint would introduce errors in gyro readings and make the unicycle misbehave. 

The rest of the bolts are without split washer. Couple of things that we liked - 1) They are using bolts instead of screws. This means we can afford to remove and assemble the unicycle a number of times. 2) All structural bolts are allen bolts. Star screws are used for fasteing covering plastic members that adds aesthetic to the device. So if you are removing an allen bolt, you are most likely removing a structural bolt. You might definitely not want to loose these bolts. 


Once these bolts are removed, the casing on one side came of pretty easily. When one side, is removed it looks like the image above. 

Our guess is that for fixing the puncture, this should do. But since we are half way though a tear down, we decided to go all the way. Moreover this is the second trip that we are making to the puncture shop - was not in a mood to make a 3rd trip in case if this level of disassembly was not sufficient. 

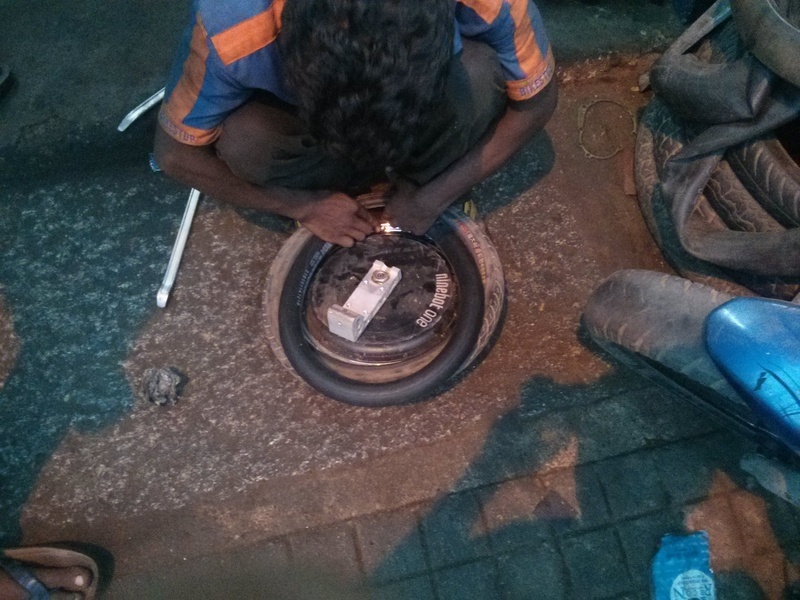
So we removed everything, so that finally it was only the wheel assembly (tyre & hub motor). That we took to the puncture repair shop and got it fixed.

Couple of other observations made 
1. 

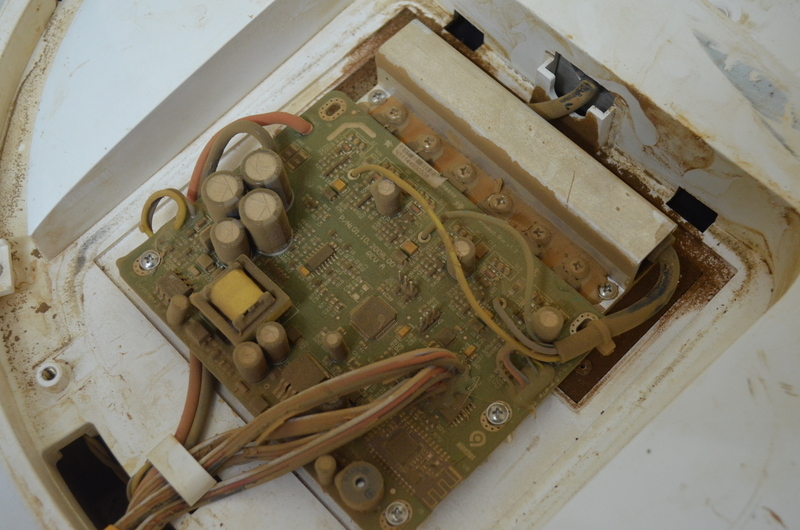
There was a ton of dust on the circuit board. We are super surprised to find this amount of dust on the circuit board. We are even more surprised that it still works. It looks like the Ninebot was not designed to work in the conditions in the farm/India. The typical places that we drive though has a lot of loose dust.
above

Weirdly there are 3 openings into the wheel cavity. You can see them in the image. This is where the dust in entering the circuit board cavity. When you drive though sandy/dusty area the wheel picks up a lot of dust, which eventually ends up here. 
2. 
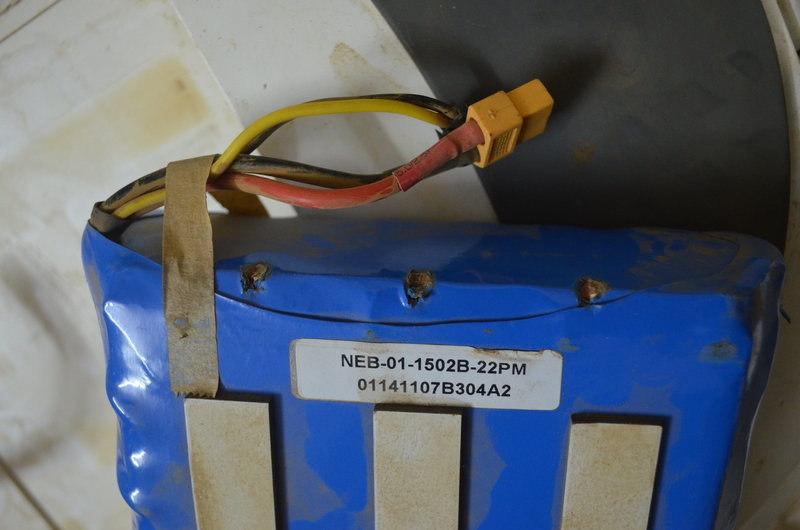
The battery pack cover casing is biting into the battery pack. This is bad for the battery pack. If it punctures the battery pack, the battery pack will most likely catch fire. This is not good at all. For the time being we left it as it is. We should put a double sided tape at those points.


Firefly Developer Meetup at Maker's Asylum

This is a quick minutes of meeting of the Firefly developer meetup that we did at Maker's Asylum on 27th Jan, 2015. 

Talk on the open source electric unicycle project, Firefly Unicycle. 


Speaker: Alex JV Co-Founders, Makeystreet. 

Outline:
What is an electric unicycle?
What is this project about? 
What are they trying to achieve with this project? 
How can they get involved? 

We bought an electric unicycle with us, so that people could try it out. We had roughly about 8-10 people who turned up. Looking forward to having the first build group for electric unicycle at the Maker's Asylum.

Prior Art / Setting bench marks

We are doing a prior art study to understand existing electric unicycles in the market. To do the study we have chosen 5 different unicycles based on various parameters. Our first internet based study showed that the primary variations are in motors capacity, diameter of the wheel, size and chemistry of the battery pack. Based on possible variations we have placed order for 5 unicycles as shown in the image above. Once we get the unicycles in our possession we will know first hand how does all these parameters feel like in real world. This will help us design our open source unicycle better. 


We have already got Freefeet in our possession. Playing with it now. We will be opening it up as soon as the holiday season is over. 

Best part - We now have a lot of unicycles to play with. Want to try them out? Come over to the Jaaga farm on Sarjapura road. 

Specs of the unicycle that we are getting:

SBUV3:

48V 1000W motor, 122Wh LiFePO4 battery, 18" wheel

Detailed tech specs - http://focusdesigns.com/sbuv3/tech-specs/

Freefeet unicycle

500w, 60v,3.5Ah, lithium-ion battery (130wh), 35cm diameter [ brand of battery is Samsung}

Gotway 14"

Image credits - www.gotway.fr

10.8kg, 14inch wheel, 60V 500W motor, 340Wh Panasonic Lithium-ion battery. Bluetooth connectivity. 

Gotway 18"

Image credits - www.gotway.fr

14.8kg, 18inch wheel, 60V 1000W motor, 700Wh Panasonic Lithium-ion battery, Bluetooth connectivity.

Ninebot one 

image credits - www.ninebot.com

12.8kg, 16 inch wheel, 1500W motor, 240 Wh Lithium ion batter, Bluetooth connectivity

We have five 800 Watt motors !

We now have five 800 Watt 48 V brushless motors. Thanks to BSA for sponsoring the motors and thanks to Ather Energy for getting it on our behalf. 

That leaves us with 5 motors that we know are really powerful but with no specs. Challenges ahead of us :
1. Get the motor to work
2. See if we can get data from the position encoders/hall effect sensors in the motor. Does the motor even have sensors?
3. Hopefully the motors does not have flywheels inside them and are bi-directional. We hear that some motors used in electric scooters are uni-directional. 
4. Find out how to attach wheels to this. Hopefully we should be able to get off the shelf wheels. 

We might be opening them up one of these days. Will post updates for the same. 

Alex

Firefly basics of self balancing - first workshop

We build a small robot to understand and implements the basics of self balancing. The robot works on the principles of self balancing. Here is a short video of it working. Since its a small robot, we are calling it Firefly Larvae :)

If you want to know the principles of how the self balancing robot works, check the documentation for the robot here - www.makeystreet.com/makey/3188

Here is video of us testing the self balancing code - 

Other than the organizers we had 14 people turn up for the discussion. 10 people were present for the workshop. 

Check out the pictures from the day

The documentation for the entire project coming up very soon - Hold on tight. 

Firefly Unicycle at Reva

On 20th Nov, we went to meet the awesome people at Reva at their factory at Bommasandra Industrial Area here in Bangalore. We went their to introduce them to the electric unicycle. Nothing much, just show them the unicycle and possibly get some feedback on how we can take this forward as an open source hardware project. 

The response for the unicycle was immense. People were crowding around it. Here are some pictures of it. 

Team Reva seems excited. They mentioned that their engineers would love to answer questions that this hardware community would have.